Below you can find instructions that will help you start online lending, from the moment you apply for your instance to the moment when you register your first loan application.
Required configuration
Step 1. Login
Log in to the system (step-by-step instructions).
You can find the login credentials (Login | Password) in the introduction email. Such initial user account has all the /wiki/spaces/KB/pages/315555913, including the Admin role and, if applicable, the Owner role.
Step 2. Users
Create user accounts for your employees (step-by-step instructions).
Step 3. Credit Products
Create Credit Product(-s) (/wiki/spaces/TLKB/pages/403013904).
Credit products are the most important part of your lending operation. All your rates, charges, and amounts are determined there.
Step 4. Document Templates
Upload Loan Agreement templates (step-by-step instructions).
Turnkey Lender supports automatically generated agreement documents based on your custom templates.
Step 5. Notifications and Reminders
Check out the notifications and due date reminders and adjust, if necessary (step-by-step instructions).
Step 6. Integrations
Set up your mailing server and, if necessary, SMS service provider.
Step 7. States
(US Edition only) Set up NSF fee and APR for your states of operation (step-by-step instructions).
Congrats! All set. Now you can create your first loan application.
Extended configuration
- How to change Passwords in TurnKey Lender.
- Adjust the /wiki/spaces/TLKB/pages/403013875, if you need more details about your borrowers.
- Set up /wiki/spaces/TLKB/pages/402751648, if you need some more incentive for non-performing borrowers – in additional to the gradual accumulation of overdue interest.
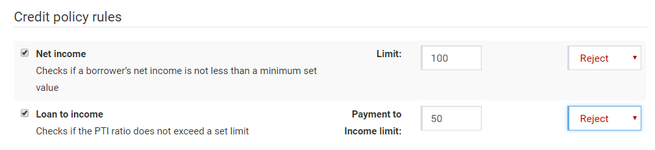
- Check out the Decision Rules and adjust them as necessary (step-by-step instructions).
To get a feel of how powerful the decision rule engine is, you may want to begin with activating the Net income and Loan to income rules. With just these two rules enabled and properly set you can significantly reduce the volume of manual processing on the Underwriting stage.
- Configure Company Settings (step-by-step instructions).