This subsection provides instructions on how to save information on payment and disbursement of loans to a separate file.
To export payment information:
1) In the option menu to the left, click Export.
2) Click the Payments Export tab.
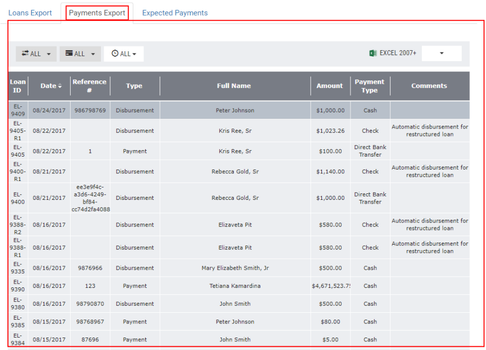
The table of the Payments Export tab displays the following information:
Loan ID: an identification number of a loan application in the system;
Date: a payment/disbursement date (depending on a type of transaction, see the Type property below);
Reference#: a payment number;
Type: a transaction type:
o Payment;
o Disbursement.
Full name: a borrower's full name;
Amount: a loan amount issued to the borrower or a payment amount received from the borrower (depending on a type of transaction);
Payment type: a type of payment made:
o Card;
o Cash;
o Check;
o Direct bank transfer.
Comments: comments, if applicable.
The interface of the workplace allows the user to customize the display of loan applications by performing the following operations:
Sorting applications in a preferred;
Filtering applications:
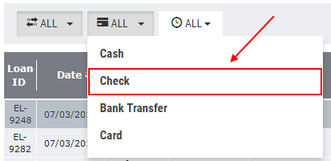
a. By a transaction type;
Note: |
To filter the applications by the transaction type, click the first All split button on the top left-hand corner of the tab and select a corresponding transaction type from the drop-down list. |

b. By a payment type;
Note: |
To filter the applications by the payment type, click the second All split button and select a corresponding option from the drop-down list. |
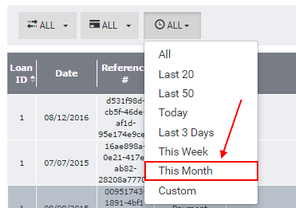
c. By a period of transaction;
Note: |
To filter the applications by the period of transaction, click the third All split button and select a corresponding option from the drop-down list. |
|
To filter applications by a custom period of transaction, click Custom in the open drop-down list and specify dates of the period of transaction in the From and To boxes. |
![]()
3) In the top right-hand corner of the Payments Export tab, click the down arrow ![]() and select a file to which data will be saved.
and select a file to which data will be saved.
Note: |
Data will be saved according to filter settings. |
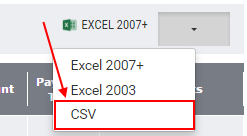
4) To save data, click the selected file.
![]()
A downloaded file gets displayed on the notification bar of the Google Chrome browser.
