Business Objective
Turnkey Lender System allows creating a flexible system in order to restrict loan visibility based on a branch office/sub-branch offices.
For example:
- For Users, linked to a branch "A" displays all loans in the system.
- For Users, linked to a branch "B" displays only loans created by the users of branch "B" and its sub-branches.
The "Branch office" feature is useful for allocation workplaces between partners, dealers or branches.
More detailed functionality you can see below.
Workflow Diagram
Workflow diagram displays interaction between the loan created from the Front-office and the loan created from the Back-office.
Loan application assignment to the branch
- In case if the loan is created from the Front-Office, it will not have a branch assignment.
- In case if the loan is created from the Back-Office, System should link the loan to the Originators branch.
Add a new branch to the System
This subsection describes the procedure of creating a new branch window.
Only Users with Administrator rule can create branches and sub-branches.
To create a branch:
1. In order to add a new Branch Office, navigate to System workplace - click on Branch Offices page.
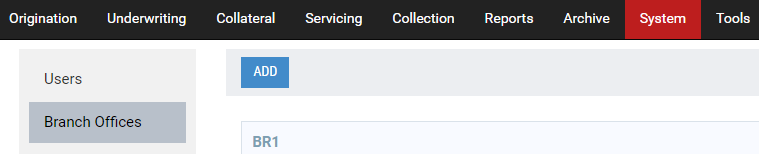
2. Click the Add button.
The Add Branch window opens:
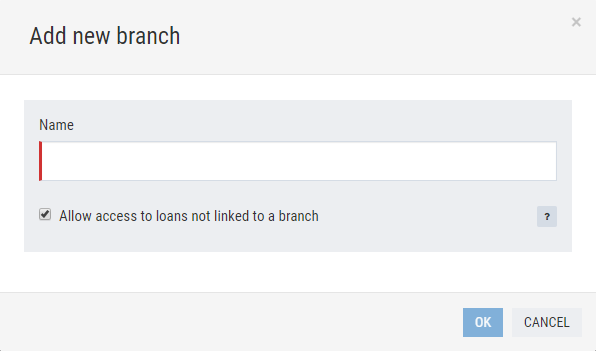
3. In the Name box, enter the name of a new Branch.
The name of the branch must be unique.
4. In the next step, you can configure permissions, which will determine which Loan Applications will be visible for branch users
- In case if "Allow access to loans notlinked to a branch" is enabled, Back-Office user will see loans which are linked to his branch and sub-branches and loans which are not linked to any branch
- In case if "Allow access to loans notlinked to a branch" is disabled, Back-Office user will see only loans which are linked to his branch and sub-branches
5. Click OK.
Use the same steps for adding Sub-branch by clicking Add button.

Assigning User to the branch
1. In order to add a new User, navigate to System workplace - click on Users page.
2. Click the Add User button.

3. Set the Branch/Sub-branch from the drop-down list.
The Add User window with permissions opens:
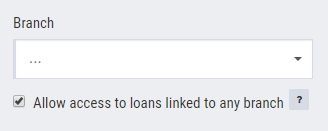
4. In the next step, you can configure permissions, which will determine which Loan Applications will be visible for corresponding Back-Office User
- In case if "Allow access to loans linked to a branch" is enabled, Back-Office user will see all available loans in the system
- In case if "Allow access to loans linked to a branch" is disabled, Back-Office user will see only loans which are not linked to any branch
Is case if the user is linked to a branch, permissions are configured by the branch settings
5. Click OK.
Loan Header & Search Filters
If the Loan application is linked to a branch system will display Branch Name in the Loan Header

In order to display loans only from a particular branch or sub-branch Back-Office, users can use a search filter.
- If selected ALL. The system displays loans LINKED and NOT LINKED to the branch
- If selected NONE. The system displays loans NOT LINKED to any branch
- If selected. List of branches. The system displays loans which are LINKED to the selected branch and sub-branches.
The filtering panel of the Branch Filter
