Managing Late Fee Plans
This subsection describes procedures of managing late fee plans.
Turnkey Lender allows applying a certain late fee policy to a credit product. A late fee policy implies charging a certain amount of fee for an overdue installment. In the system, the late fee policy corresponds to a late fee plan created by the user with the Admin role. Depending on business objectives, the administrator can create multiple late fee plans, each late fee plan incorporating a set of fees for overdue days (refer to Adding Late Fee Plans). However, only one late fee plan can be applied to the credit product and, consequently, to all loan applications created on the basis of this credit product. For more information on how to add a created late fee plan to the credit product, refer to Adding a New Credit Product.
A list of all late fee plans created in the system can be viewed on the Late Fees tab of the Past Due Settings area:
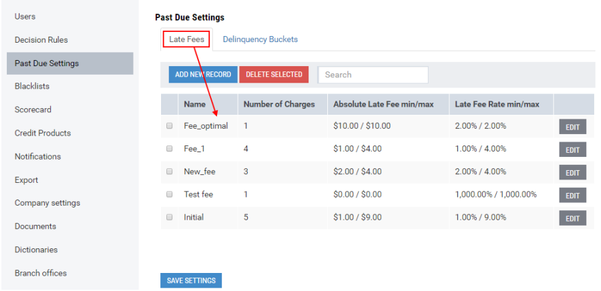
The table of the Late Fees tab displays the following information:
Name: a name of a created late fee plan;
Number of charges: a number of late fees created within one late fee plan (refer to Adding Late Fee Plans);
Absolute late fee min/max: a minimum and maximum fee amount specified in the created late free plan;
Late fee rate min/max: a minimum and maximum percentage of an outstanding balance. A fee amount is calculated on the basis of a specified percentage of the outstanding balance.
The subsections below describe procedures of creating, editing and deleting late fee plans.
Adding Late Fee Plans
This subsection describes the procedure of creating a late fee plan.
The administrator can create the late fee plan comprising a list of fees charged for overdue installments on the basis of days in arrears.
To create a late fee plan:
1) In the option menu to the left, click Past Due Settings.
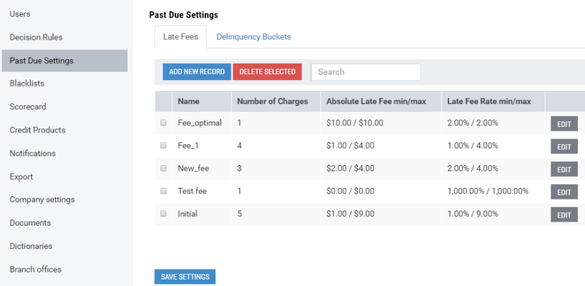
The Late Fees tab of the Past Due Settings area displays a list of all late fee plans created in the system:
2) Click the Add new record button.
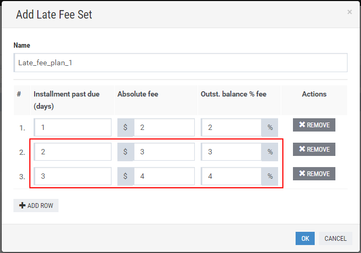
The Add Late Fee Set window opens:
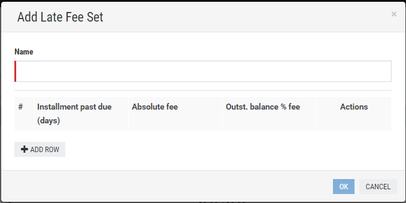
3) In the Name box, enter a name of a late fee plan.
Note: | The name of the late fee plan must be unique. |
4) Click Add row to add a late fee.
5) In the Installment past due (days) box, enter a number of days in arrears.
Note: | The number of days in arrears must be unique for each created late fee. |
6) In the Absolute fee box, define a fee amount.
A defined fee amount will be applied if an installment is overdue for a period specified in the Installment pas due (days) box above.
7) In the Outst.balance % fee box, specify a percentage of an outstanding balance. The fee amount will be calculated on the basis of a specified percentage of the outstanding balance.
Note: | The system provides for two options of charging a fee: |
The late fee has been added.
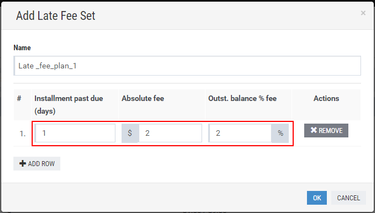
8) (Optional) Click Add row and repeat steps 5-7 to add other late fees.
If the overdue loan migrates from one past due period to another, a final fee amount is calculated as the sum of fees for This and previous past due periods.
If days in arrears overlap with a grace period, a fee will be charged after the end of the grace period, namely on the first day after the end of the grace period.
9) In the Add Late Fee Set window, click OK to save the late fee plan.
Note: | At least one late fee must be specified for saving the late fee plan. |
10) In the Past Due Settings area, click Save Settings.
The confirmation message opens:
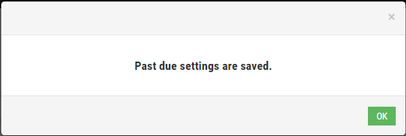
a. Click OK.
The late fee plan has been created and can be added to a credit product. For more information on how to add the created late fee plan to the credit product, refer to the Adding a New Credit Product subsection below.
Modifying Late Fee Plans
This subsection describes the procedure of modifying a late fee plan previously created.
Any changes to the late fee plan are applied only to new loan applications that will be created on the basis of a credit product to which this late fee plan is applied. If the late fee plan is changed, corresponding changes are applied to all credit products where this late fee plan is used.
To modify a late fee plan:
1) In the option menu to the left, click Past Due Settings.
The Late Fees tab of the Past Due Settings area displays a list of all late fee plans created in the system:
2) In the table, click Edit opposite a late fee plan to be modified.
The Edit Late Fee Set window displays a number of late fees included in the late fee plan:
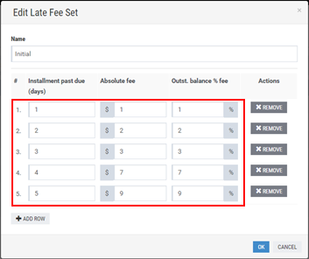
3) (Optional) In the Name box, edit a name of the late fee plan.
Note: | The name of the late fee plan must be unique. |
4) Repeat the relevant steps of the Adding Late Fee Plans subsection above to edit late fees.
5) (Optional) Opposite a late fee, click the Remove button to delete it if necessary.
6) (Optional) Click Add row to add a new late fee and repeat the relevant steps of the Adding Late Fee Plans subsection above to specify necessary values.
7) In the Edit Late Fee Set window, click OK to save changes.
8) In the Past Due Settings area, click Save Settings.
The confirmation message opens:
a. Click OK.
A selected late fee plan has been modified. Changes made do not affect existing loan applications created on the basis of credit products where this late fee plan is used. These changes will be applied only to new loan applications that will be created on the basis of corresponding credit products.
Deleting Late Fee Plans
This subsection describes the procedure of deleting a created late fee plan.
If a late fee plan being deleted is used in credit products, the administrator can cancel application of any late fee plans to these credit products or can select another late fee plan to be applied instead of deleted one.
To delete a late fee plan:
1) In the option menu to the left, click Past Due Settings.
The Late Fees tab of the Past Due Settings area displays a list of all late fee plans created in the system:
2) In the table, put a check mark opposite a late fee plan to be removed.
3) Above the table, click the Delete selected button.
If the late fee plan is used in credit products, the open window displays credit products in which this late fee plan is used:
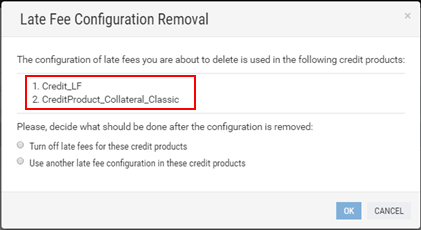
a. In the open window, select Turn off late fees for these credit products to cancel application of any late fee plans to credit products displayed.
b. Select Use another late fee configuration in these credit products to select a late fee plan that will be applied to displayed credit products instead of the late fee plan being removed.
c. In the Late Fee Configuration Removal window, click OK to save settings and remove the selected late fee plan.
If the late fee plan is not used in any credit products, the following delete confirmation message is displayed:
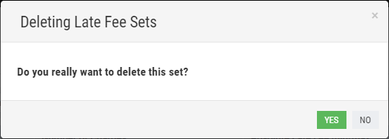
a. Click Yes to delete the selected late fee plan.
4) In the Past Due Settings area, click Save Settings.
The confirmation message opens:
a. Click OK.
A selected late fee plan has been removed.