...
...
...
...
...
...
...
...
...
...
...
...
...
...
...
...
...
...
...
...
...
...
...
...
...
...
...
...
...
...
...
...
...
...
...
...
...
...
...
...
...
...
...
...
...
...
...
...
...
...
...
...
...
...
This article shows how to use Merge Fields to embed dynamic text data into system documents, which will be generated by Turnkey Lender for every new loan.
Step-by-step instructions
...
There are several ways too insert a merge field into
...
a document.
Use Word Wizard
Example
To insert the name of the borrower into the phrase "This agreement is made and entered by and between ... and My Lending Company" you need to:
...
Place the cursor after the wordbetween.
...

...
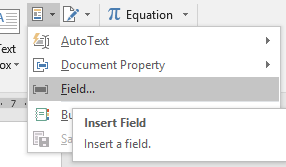
ClickInsert→Quick Parts→Field.
...
...
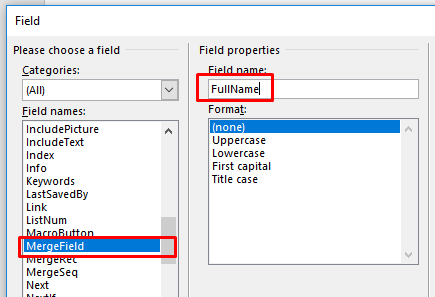
TypeFullNamein theField nameinput box. ClickOK.
...
...
You will see the Merge Field as a quoted text. It receives a background, when you place the cursor over.
...
![]()
![]()
...

...
Place the mouse cursor to where the merge field should be in the text of your document template.
Go to the
...

Figure 1.
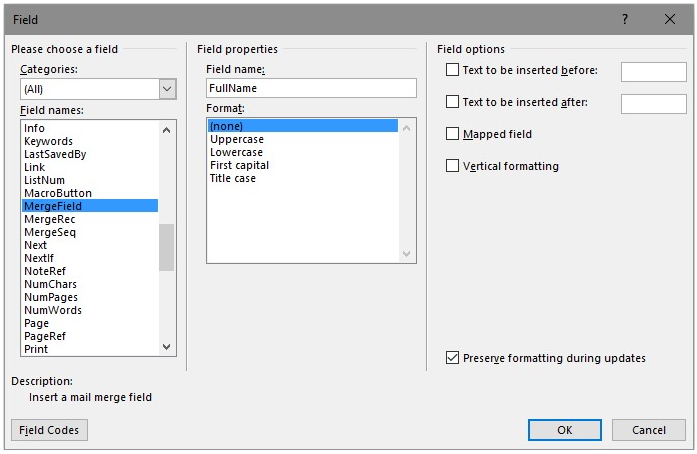
Figure 2.
Insert a field

Set the fields type to MergeField, enter the required value from the list of merge fields in the Field Name and click “OK”
...
4. You will see the field name in the corresponding area.
Another Way to Enter and View a Merge Field
Another way to enter a merge field is to press Ctrl+F9 (on some laptops its fn+Ctrl+F9)
Bold figure brackets will appear |  |
Inside the brackets write “MERGEFIELD “Name of the field” \*MERGEFORMAT” |  |
If you are using Copy/Paste functionality, you can select part of the text and press Ctrl+F9 (on some laptops its fn+Ctrl+F9 to put it inside the brackets.
Please note that simply typing brackets will not work out.
Insert a Table of Merge Fields.
You can create a dynamically generated table (Schedule, Late fees) in a Loan Agreement.
To insert
...
such a table:
Open the Word document with the text of your Loan Agreement.
Create a table template where table values are in one line. System will create a necessary number of lines automatically.
To mark the beginning of a merge table, insert a merge field with the name TableStart:TableName, where TableName corresponds to the table in the System. For example, to display charge line items for a Schedule, create a TableStart:Schedule.
To mark the end of the merge table insert another merge field with the table name TableEnd:TableName.
Between the TableStart and TableEnd marking fields, place merge fields that correspond to the fields of your table columns. These merge fields will be populated with data from the table.
Important: Multi-line items can be displayed only within a table and can not be displayed in other areas of the template.
Available tables and fields you can find in the List of Merge Fields.
Example.
Schedule table creation.
Installment Number | Due Date | Total Amount | Principal Amount | Interest Amount | Commissions Amount | Balance |
|---|---|---|---|---|---|---|
«TableStart:Schedule»«InstallmentNumber» | «DueDate» | «Total» | «Principal» | «Interest» | «Commission» | «Balance»«TableEnd:Schedule» |
Total | «TotalAmountToPay» | «LoanAmount» | «TotalInterest» | «TotalCommission» | ||
...
...
Figure 3.
Insert Formula
You can perform calculations and logical comparisons in a table using standard Word formulas:
Open the Word document with the text of your Loan Agreement.
Place the cursor to where the value should be calculated in the text of your document template.
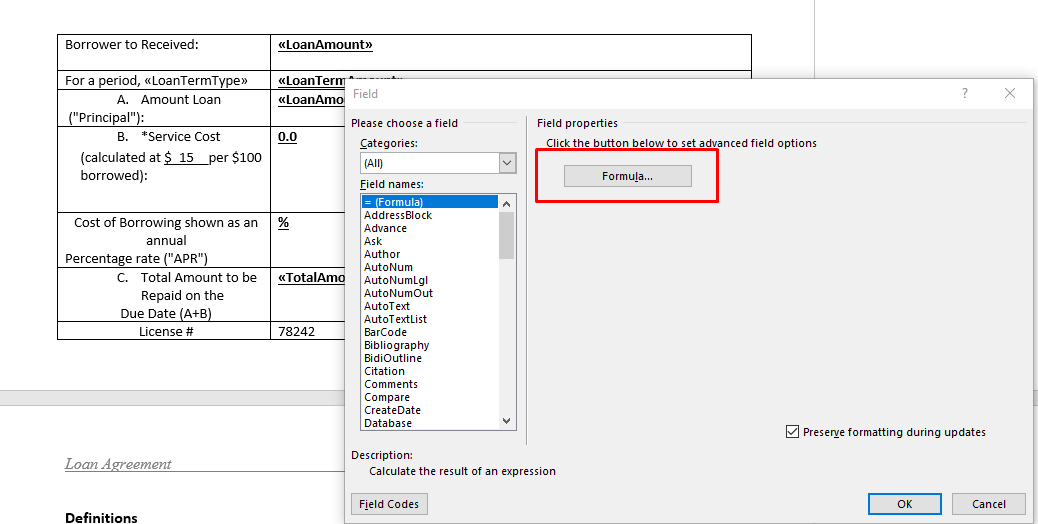
Go to the Insert tab of the ribbon and click on the Quick Partsdrop-down button. Select Field (see the image on the right) (Figure 1).
In the Field dialog box, select Formula in the Field names selection box (Figure ).
Enter formula (Figure 4). Merge fields, table cells or numbers can be used for calculation. Names of table cells are formed as in Excel (e.g. A1, where A is line, 1 is column). You can refer to a bookmarked cell by using its bookmark name in a formula.
Click OK.
...
Figure 4. Using Formula.
Example.
To calculate Service Costs as 15% of the Loan amount you need to multiply Loan amount (cell B1) on 15%.
...
...
Figure 5.
Insert logical comparisons (Function IF)
It is possible to use the function IF to show correct value based on some conditions
Open the Word document with the text of your Loan Agreement.
Place the cursor to where the value should be calculated in the text of your document template.
use If...then...Else field construction. Type the word IF and insert all of the merge fields as shown in the example below and then select them all and use Ctrl+F9 to enclose them inside a pair of field delimiters { }.
Example :
{ IF {MERGEFIELD LoanBranch} = "Branch 1" "Region 1" { IF {MERGEFIELD LoanBranch } = "Branch 2" "Region 2" { IF {MERGEFIELD LoanBranch } = "Head Office" "Head Office" } }}
The IF field only looks complex, but its purpose is simple:
If the LoanBranch is Branch 1, print Region 1.
If the LoanBranch is Branch 2, print Region 2.
If the LoanBranch is Head Office, print Head Office.
In this case, there should never be an empty LoanBranch type value, but if that happens, you'll want to accommodate that by adding an additional IF. Notice that the three IF fields
...
are nested, one within another--that syntax is important.
Insert Symbols
To display necessary symbols you should use standard Word tools :
Open the Word document with the text of your Loan Agreement.
Place the cursor to where the symbol should be in the text of your document template.
Go to the Insert tab of the ribbon and click on the Symbol button.
In the Font dropdown, select the necessary symbol (Figure 6)
Click Insert.
...
...
Figure 6.
Hit Alt + F9 on your keyboard to switch between the field codes and field values.
...